
Ok - so it may be a bit basic, but a post to ST-Owners revealed that a number of people found this information very useful. I thought I'd illustrate it.
This isn't a step by step set of instructions, although the photos are in order of removal. Many of the comments are to do with what goes where, and what to watch out for when putting it back together.
It might also help identifying where those screws go that you have left over after refitting everything.
Click the images for more detailed notes and a clearer picture. Alternatively, use the menu on the right of the screen.
|
|
Lower Cowl The lower fairing has to be removed to get at the mid fairng panels. 5 allen bolts (2 types - note the difference when you remove). One push pin into the main faring at foot height. 4 large trim clip fittings underneath. |
|
|
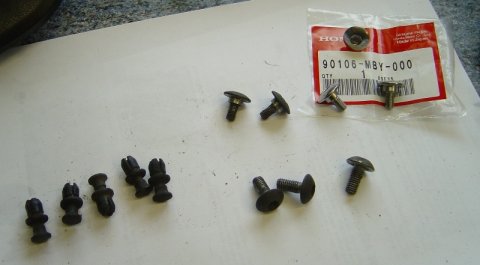
Lower Cowl Fixings Detail of the fixings for the lower cowl. |
|
|
Lower Cowl Front. This has to be removed to get at the inner fairing. |
|
|
Inner Fairing Two inserts accessed from either side of the front wheel. |
|
|
Middle Fairing At last - the bit that you really wanted to remove. And its only held on with 6 fixings. |
|
Reassembly: More detail is given in each of the above sections. (Click the photos). This is just a quick sequence for one side. i) Offer the middle fairing to the top fairing. On the left, check the covered multiway electrical connector locates inside the clip on the middle fairing. Check the wiring between the frame and the fairing pocket. Fit lug inside rubber grommet near to footrest. Check 2 holes in fairing pocket fit under the holes on the dash. Loosley fit allen bolt above side vent (Bolt has a bigger shoulder than the bolts for the bottom fairing. ii) Check fit of tabs near headlight, indicator wiring fits through holes, Right side temperature connector is accessible. Loosely fit shouldered cross head screws near mirror. Check cables alongside fairing pocket, check lug near footrest again, left side Honda heated handlebar switch (if fitted). Check alignment of holes in front of fairing pocket. Loosely fit two bolts near tip over bars. iii) Fit shouldered cross head screws in fairing pocket. Tighten bolts fitted so far. iv) Fit inner cowl upwards from near radiator - check position from above and wiring near fairing pocket. Check lugs. Fit one trim clip to hold in place. Right side don't forget to connect temperature sensor wire. v) Fit lower front cowl. Check tabs fit with inner cowl. Trim clip in top holes. vi) Fit lower cowls. Shoulder bolts on bare plastic holes (x2), non-shoulder on bolts with metal sleeve inserts (x3). Dont forget tabs near footrest. vii) Tighten all fitted bolts. Fit trim clips. Dont forget 2 trim clips at top near fairing pockets. |
|
These pages are merely a personal record of maintaining a
Honda ST1300.
Anyone carrying out similar work should acquaint themselves with the official,
correct procedures or employ the services of a qualified technician.