
The push rivet (which is positioned near your toes when riding), can be renoved by pressing on the centre pin. It will pop in by a few mm, and the entire rivet can be removed from the fairing. The photo doesn't show the push rivet. (Oversight on my part). To re-use the rivet, the head of the pin must be protruding from the rivet. Push the rivet into place using the side flanges. When in position, push the pin into place so that the head is flush.
The larger trim clips can be removed by pulling the centre pin out - there is a distinctive click - and then removing the rivet. These can be a bit difficult to do with fingers if they are caked with mud and muck. To replace, put the rivet into place and lock by pushing the head of the pin. At least one of the pins joins the two halves of the middle fairing, as well as attaching the lower cowl. Make sure that the holes are aligned, and if necessary give some support with your other hand when pushing in the rivet.
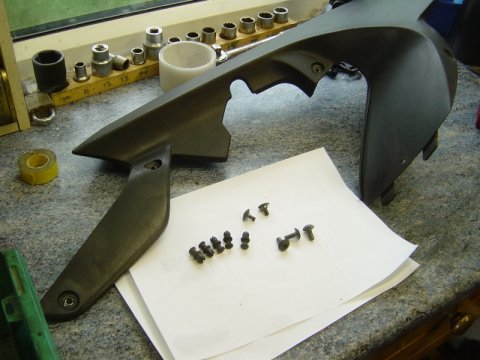
Identify the fittings that you have left over !
All of the trim clips here are from under the lower cowl. The bolts are freshly removed before being cleaned - and above, some spare bolts just in case.
The 5 round head allen bolts hold the lower cowl in place - 5 on each side.
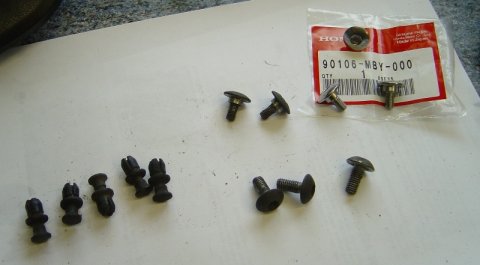
Note that their are 2 different type of bolt. Those with a shoulder (x2) and those without (x3). From the top photo you can see that the holes at the rear of the cowl (left side of photo) have a metal collar insert. If they haven't, then start hunting around your garage floor. They have fallen out ! These holes use the bolts without the shoulder. The two front holes don't have the metal collar. The shoulder is the same thickness (+ a bit) as the plastic of the cowl. It is there to stop you tightening the bolt tightly onto the plastic. If you get the bolts in the wrong way round either you will not be able to tighten the front bolts properly, or you will cause a crack in the plastic around the hole.
Don't overtighten these bolts. For some reason, they seem to work tight rather than work loose. Just tight enough will do.
Spares
I always have a few of the shoulder bolts spare. The metal is soft, and after a few fittings the hexagon hole can get rounded. Given that the bolts seem to get tighter, it can make them impossible to remove. Any sign of rounding, and I won't reuse them. Too many times has a simple job become a problem because I can't remove the bolt in the side panel or lower cowl.
I also keep a few spare trim clips.
These pages are merely a personal record of maintaining a
Honda ST1300.
Anyone carrying out similar work should acquaint themselves with the official,
correct procedures or employ the services of a qualified technician.